How to Run Pytest in VSCode | Complete Guide
Visual Studio Code (VSCode) is a popular code editor known for its versatility and support for various programming languages and testing frameworks. Pytest is a powerful testing framework for Python that makes it easy to write simple and scalable test cases. This article will guide you through the steps to set up and run Pytest in VSCode.
Prerequisites
Before you start, ensure you have the following installed on your system:
Python
Visual Studio Code
Pytest
You can install Pytest using pip:
pip install pytest
Setting Up Pytest in VSCode
Install Python Extension for VSCode
First, install the Python extension for VSCode. This extension provides rich support for Python, including IntelliSense, linting, and testing.
Open VSCode.
Go to the Extensions view by clicking the Extensions icon in the Activity Bar on the side of the window or by pressing Ctrl+Shift+X.
Search for “Python” and install the extension by Microsoft.
Configure the Python Environment
After installing the Python extension, you need to select the Python interpreter that you want to use for your project.
Press Ctrl+Shift+P to open the Command Palette.
Type “Python: Select Interpreter” and select it.
Choose the interpreter that matches your Python environment.
Create a Pytest Configuration File
To run Pytest in VSCode, you may want to create a configuration file to customize the testing behavior. Create a file named pytest.ini or tox.ini in the root of your project directory with the following content:
[pytest]
minversion = 6.0
addopts = -ra -q
testpaths =
    tests
This configuration specifies the minimum Pytest version, additional command-line options, and the directories where tests are located.
Writing Test Cases
Create a directory named tests (or any name you prefer) in your project and add your test files. Here’s an example of a simple test case in test_sample.py:
def test_addition():
    assert 1 + 1 == 2
def test_subtraction():
    assert 2 - 1 == 1
Running Pytest in VSCode
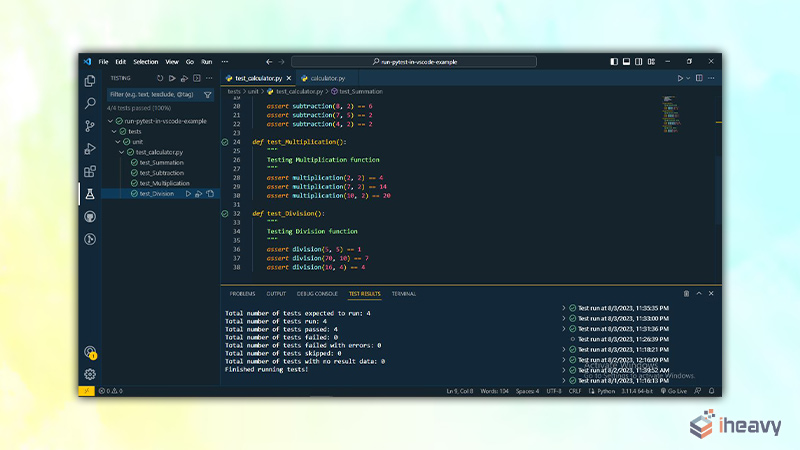
VSCode provides a Test Explorer that allows you to discover and run tests easily.
Open the Command Palette (Ctrl+Shift+P).
Type “Python: Discover Tests” and select it. VSCode will search for test files and discover test cases.
Once the tests are discovered, you can see the test explorer on the sidebar with a beaker icon.
Click on the test explorer to see the list of tests. You can run individual tests or all tests by clicking the run icons.
Example Code
Here is an example of the structure and content:
Directory Structure:
my_project/
├── tests/
│   ├── test_sample.py
├── pytest.ini
├── main.py
Content of test_sample.py:
def test_addition():
    assert 1 + 1 == 2
def test_subtraction():
    assert 2 - 1 == 1
Content of pytest.ini:
[pytest]
minversion = 6.0
addopts = -ra -q
testpaths =
    tests
Frequently Asked Questions
Why are my tests not being discovered in VSCode?
Ensure that your test files are named correctly (e.g., starting with test_ or ending with _test.py) and are located in the specified test directory.
How can I debug my tests in VSCode?
You can add breakpoints in your test files and then run the “Debug Test” option from the Test Explorer to debug your tests.
Can I run specific tests using Pytest in VSCode?
Yes, you can right-click on a specific test or use the run icons next to the test name in the Test Explorer to run specific tests.
Conclusion
Running Pytest in VSCode is straightforward with the help of the Python extension and the Test Explorer. By following the steps outlined in this guide, you can easily set up your testing environment, write and discover tests, and run them with ease. This integration enhances productivity and makes the testing process more efficient. Happy testing!

![How to Convert a Parquet File to CSV | [Answered]](https://www.iheavy.com/wp-content/uploads/2024/06/How-to-Convert-a-Parquet-File-to-CSV-768x432.webp)