Configure SQL Server To Allow Remote Connections | In 7 Simple Steps
Configuring SQL Server to allow remote connections is a key step in enabling external systems or applications to communicate with and access your SQL Server instance from different locations. This setup extends the reach of your database, enabling it to serve multiple users or systems across various networks.
Here is a detailed chalked configuration procedure.

Step-by-Step Guide to Configure SQL Server for Remote Connections
Configuring SQL Server to allow remote connections involves a series of steps to ensure secure access from external systems or applications. Here’s a stepbystep guide:
1. Enable TCP/IP Protocol
- Open SQL Server Configuration Manager.
- Expand “SQL Server Network Configuration” and select “Protocols for [Your SQL Server Instance]”.
- Rightclick on “TCP/IP” and choose “Enable” if it’s not already enabled.
2. Specify TCP/IP Port (Optional If Default Port is Not Used)
- Rightclick on “TCP/IP” and select “Properties”.
- Go to the “IP Addresses” tab and scroll down to find the “IPAll” section.
- Set a specific port number under “TCP Port” if using a nondefault port (e.g., 1433).
3. Configure SQL Server Firewall
- Open Windows Firewall settings.
- Navigate to “Inbound Rules” and create a new rule.
- Choose “Port” as the rule type and specify the TCP port used by SQL Server (default: 1433).
- Allow connections from specific IP addresses or a range of IPs for added security.
4. Restart SQL Server Services
- Open “SQL Server Services” in SQL Server Configuration Manager.
- Restart the SQL Server service to apply the changes made to the network configuration.
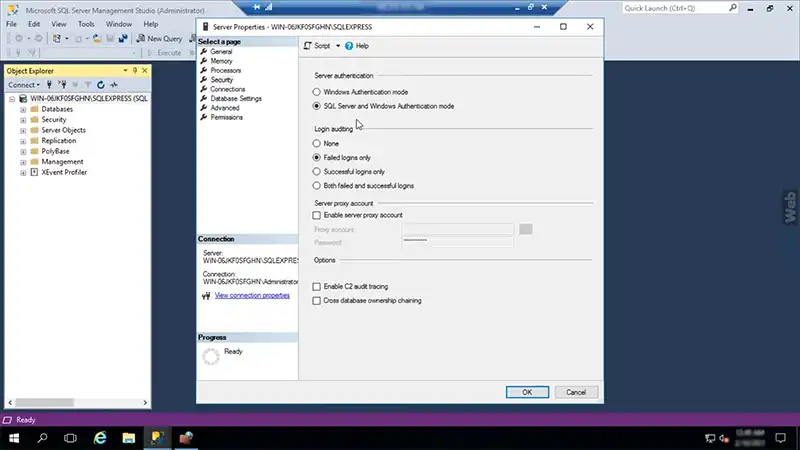
5. Enable SQL Server Authentication Mode
- Open SQL Server Management Studio (SSMS).
- Rightclick on the server name and select “Properties”.
- Go to the “Security” tab and choose “SQL Server and Windows Authentication mode”.
6. Create SQL Server Login
- Expand “Security” in SSMS.
- Rightclick on “Logins” and select “New Login”.
- Enter login details and set appropriate permissions for remote access.
7. Test Remote Connection
- Use SQL Server Management Studio or a preferred client tool to connect remotely.
- Enter the server name, port (if nondefault), and login credentials.
- Verify successful connection to the SQL Server instance.
Remember, while enabling remote connections, prioritize security by configuring firewalls, using strong authentication, and limiting access to specific IP ranges or authorized users. Regularly review and update these settings to maintain a secure SQL Server environment.
Frequently Asked Question
1. Why Allow Remote Connections In Sql Server?
Answer: Enabling remote access expands SQL Server’s reach, letting external systems or apps access the database from different places, fostering multi-user access.
2. How To Secure Sql Server For Remote Access?
Answer: Prioritize security with firewalls, strong authentication modes, and restricted access for authorized users or IPs to safeguard the server.
3. Any Tips For Non-Default Port Usage In Sql Server Remote Access?
Answer: Ensure the chosen port is open in SQL Server Config and firewalls. Clients must know and use the correct port number for connections.
Conclusion
Enabling remote access in SQL Server broadens its reach, allowing outside systems to connect and fostering multi-user access. To safeguard the server, prioritize security with firewalls, strong authentication, and restricted access for authorized users or IPs. Ensure the chosen port is open and known by connecting clients for smoother connections. Always review and update settings for a secure environment.


